Showing posts with label party. Show all posts

Monday, June 15, 2015

Circus Circus!


Hello my beautiful viewers,

Summer time is here and I am so excited to share with you all this adorable baby shower theme. As soon as I found out that one of my friends and her sister were both having girls, another friend and I got to work and put together this cute circus baby shower. We had a really fun time bringing to life all of our creative ideas. Hope you all enjoy, details will be listed below the pictures!

The drum the ty monkey is sitting on is a plant pot hand-painted with a zig-zag design.
TY: Michaels | Plant Pot: Michaels | Peanuts: Local Grocery Store
The centerpiece also included this clear cylinder vase filled with peanuts and topped with fresh flowers.
Flower: Costco | Cylinder Vase: Michaels | Label & Ribbon: Michaels
My favorite part, the favors! These plastic bags were filled with a hand-crafted soap bar to represent the gold fish you win at a circus/fair. We adorned with a ticket and sealed it with a bow.
Soap: Michaels | Tickets: Party City | Tablecloth: Joann & Party City
On to the desert table. Of course there is no such thing as a circus without popcorn, so we put these boxes together and made them baby shower appropriate - "Poppin' Soon"
Boxes: Etsy | Popcorn: Local Grocery Store
Lastly, we created the same stand as we did for the monkey (above) and found a cute cotton candy machine to display as an adorable prop.
Cotton Candy Machine: Michaels | TY Giraffe: Michaels | Candy: Party City

XO Cindy


Friday, August 29, 2014

Last Event in August

I am soooooo excited to share with you all the fun projects that I have been working on to fulfill a successful event this weekend! My really good friend trusted me with planning her daughter's FIRST birthday party. I am so honored and happy to have been given this opportunity and I know everything is going to come out great.

Here's a little sneak peek of what I have been working on!


Stay tuned for the full blog post on this event!

XO Cindy

Monday, August 18, 2014

Lets Build a Lego Party


At last, I get to share with you all the latest party that I had been working on!

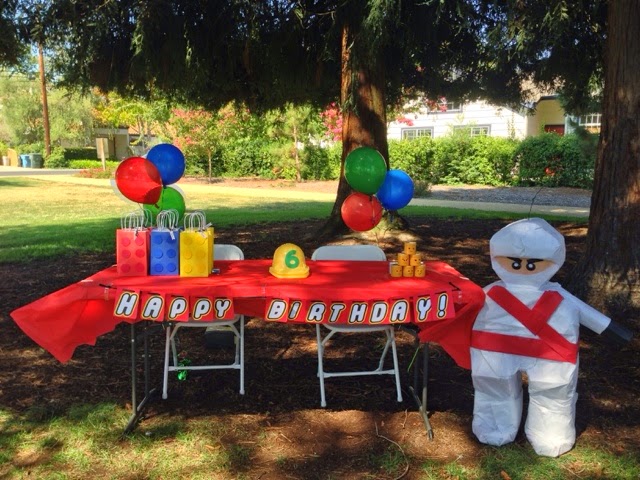
Below is the cake table, decorated with colorful balloons and a detailed banner. Oh! and let's not forget about the Lego ninja pinata.


Now on to the details:

The utensils were placed in this cube created by using various sized legos. Cute touch to the simplicity of displaying utensils!


The centerpieces were created by using the same technique as the utensil holder, except we added a number 6 (for the age) and these cute cutouts of lego heads!


Cake table details:

We purchased these gift bags from our local craft store (lucky for us, they all came in one pack). We cut out 6 circles to place on each bag to mimic a lego piece. Lastly, we added a small tag that said "Thanks!" onto the handle of the bag.


We found these cute tins at our local craft store and decided we would fill them with lego candy and draw expressive faces on them!

They turned out to be a hit!


Lastly, the cake!

It was designed with no specific theme, just general lego. White cake with strawberry custard filling inside (if I may add)!


XO Cindy

Friday, August 8, 2014

Sneak Peek: Lego's are Cool

I am super excited for the next couple of events that I will be preping for! Here's a sneak peek of the purchases made for the lego themed birthday party! I seriously cannot wait to show you all the cute ideas that I am coming up with (because it is REALLY difficult to find Lego party supplies).


Please stay tuned and share any ideas you may have!

XO Cindy

Wednesday, August 6, 2014

Here He, Here He!

You are invited to the pinkest party of your life!

Finally, I am able to showcase all of the hard work that has gone into this Pink Princess party for my beautiful niece, Andrea!

Below is an image of a princess piggy bank that I purchased at TJ Maxx. I thought it was so cute and perfect for the theme given that it is wearing a crown AND pink bow!

This next centerpiece, I created myself. I picked up the letter "A", glitter glue, ribbon, styrofoam, and flowers at a local craft store. 

As long as it sparkled and was pink, it was perfect for this event!


Lastly, for the centerpieces, I picked up this castle at Michaels and painted it myself. Of course I had to add some glitter to it as well (:


Moving on to the dessert/cake table:

The chandelier I purchased on clearance at Michaels. It was really easy to make and fit the princess theme perfectly!

Also, the candy jars were purchase miscellaneously throughout the years, but filling them with pink treats add the right touch!


Pinata Time!!!!!

How adorable is this castle pinata???


The final touch to this party was this adorable banner (made by me!), hanging over the lunch buffet!


I seriously had the most amazing time putting this event together for my little princess! I cannot wait to continue sharing with you all my next event!

XO Cindy

Monday, July 28, 2014

Oh Boy!


Hello my beautiful viewers!

I am so happy to finally show you all everything that I have been working on these past few weeks! My cousin and his wife are expecting their first baby boy and this "Little Man" theme could not have been more fitting. Below are pictures of the baby shower decor:

The bags were filled with the prizes that were given out for the individuals who won each game.

Candy jars can be filled with anything your heart desires! In this case it was gorgeous silk flowers.


Now, the anticipation for this little man to arrive!

XO Cindy


Monday, July 14, 2014

Princess Party

Hello My Beautiful Viewers!

Finally I completed the project I was working on (pertaining to my sneak peek) and I am soooo excited to share with you all how I made these gorgeous invitations.

Lets get started!

I used the Cricut to cut out the star, and once it was cut out, I worked directly from my computer to line up the text to fit perfectly in the center of the cutout.


(Paper from Michael's)

After printing and cutting out the stars, I applied a thin outline of pink glitter by using a glue glitter with a thin applicator wand. This process took the longest because I wanted all of the sides have the same thickness of glitter glue.

(Glitter Glue by Studio G - Michaels)

For the next step, I listed the products needed:

(Lollipop Sticks)

(Glue Gun)


I measured the length of the stick to the size of the star and (to my likings) glued it down using the hot glue gun.


Two steps that I missed to take pictures of:
  1.  Repeat the first two steps with the information of the event so that you can glue it on the reverse side and hide the lollipop stick
  2. Purchase any ribbon of your choice, tie a knot and/or bow onto the stick, and glue it a bit for it to stay in place
Your finished product should look like the image below!


I had an immense amount of fun putting these princess invitations together,

Hope you all enjoyed this DIY!

XO Cindy


Monday, June 23, 2014

Unicorns are Cool

Hello my beautiful viewers!

This weekend was a very festive one as my niece turned 13! we went out and bought various items to create her unique desire for a unicorn party. Below are a few photos of the event. 

I would love to share with you all any DIY displayed in these pictures (upon request).

Hope you all enjoy!


XO Cindy 

Friday, March 14, 2014

Sneak Peek - Graduation


Here is a mini haul of the supplies I have gathered, thus far, for my graduation! I'm so excited to finally fulfill one of my most dearest goals in life, and that is to obtain a college degree!!! 

In honor of this accomplishment, I will be having a celebration with all of my loved ones that have supported me through this journey. 

Let's move on with the items I have picked up!

Below is a picture of my graduation invitations and thank you cards! I have always believed that taking the time to thank everyone that took the time to attend your event, deserves a little appreciation. Writing them a little thank you not will always brighten anyone's day.

Party City - $7.99 ea.

Next is the fun/decorative stuff!

I picked up these simple picture frames because I want to create my own chalkboards with inspirational quotes to place all around my venue. I thought these were perfect for my modern event.

Dollar Tree - $1.00 ea.

Unfortunately (or fortunately) these frames have no stand attached to the back of them, therefore I also picked up these cute gold easels! Luckily for me, my schools colors contain black and gold, so it worked out!

Dollar Tree - $1.00 ea.

Lastly, I wanted to create a sign in "book" idea for all of our guests. I found this really cute idea of having them write suggestions/thoughts/anything on a rock and placing it into a clear glass jar! I fell in love with this idea because it can easily be a home decor piece (but a bit more meaningful)! Due to this idea, I purchased black river rocks big enough for creative messages.

Dollar Tree - $1.00 ea. bag

This is the end of this mini haul but I will continue to update you all with any new items that I put together for my event!

XO Cindy

Monday, February 24, 2014

DIY: Paper Rose Garland

I have been in the mood of crafting and what better way to do it, than to do it for an event that I am helping to plan! 

Below are the supplies you will need to recreate this garland.


You will need:
-Card stock paper (any color)
-A pair of scissors
-Hot glue gun
-Extra glue
-Ribbon (any color)

Let's get started!

Step 1: We are going to cut an 8 1/2 x 11 paper in half, then in 2/3, and then the last 1/3 in half. The photo below defines what I stated.


Step 2: We are going to take the squares that we cut and cut them into a circle shape.

These circles do not have to be perfect, the imperfections play a key role on how realistic they will look later on!

Step 3: We will then cut these circles into swirls!

Again, keep in mind that these swirls do not have to be evenly cut!

Step 4: Starting from the tip of the swirl, roll the paper as shown below.


Once you're done with the 4th step, you should end up with a rose that looks like this:


Step 5: the center of our swirl is a round flat part that will serve as the base of our flower. Using a hot glue gun, glue the bottom of the rose to the swirls so that the paper does not begin to unroll.


Now we have created our rose!


Make sure to make plenty of them because you will need it for the garland!

GARLAND

Step 1: we will need to collect 3 tiny roses, any color of your choice, and glue them together using the hot glue gun


Step 2: Glue the back of the roses and stick it onto your choice of ribbon. I decided to use black, appropriate for the theme of my event! 

Make sure you set a scale of how separate you will be flying your flowers onto the ribbon. I decided on 6 inches because I wanted to emphasize the black ribbon. 

OPTIONAL

Feel free to make it your own by adding gems, sparkle, or anything else you can think of!


I decided on adding a bit of rhinestones to the center of a few flowers! I'm in love with it and I cannot wait to display it at the "Breakfast at Tiffany's" bridal shower next month!


XO Cindy